
15 February 2011

Printing Implications and Design Compromises
Unfortunately to print my current model is not possible. The printing time would be approx. be 17 hours and have to much support material (4 hours worth) to keep the design from breaking that it would end up looking like a ball of material. The scale of the piece 120mm x 120mm x 35mm is not that big so each strand of rib would be extremely small and fragile and easily broken.
I have had to go back to my design and compromise some of the key features of the model so that it becomes more suitable to print.
Original design

Adapted design.

As you can see I have had to cut the original model in half however I have still kept the concept of each single piece being able to pull out and sit separately. I have added cubes to the bottom of each piece to allow the model to sit straight and to add extra support. I have left the individual ribs the same size as I did not want to compromise on the design too much.
The whole process was very interesting it the way that us as surface designers had produced pieces which are quite tactile and unique, and perhaps we expected more out of the model than what could actually be physically produced and printed.
The process with which we have been through is, I imagine very similar to how it works in the market/industry. Designs are produced and because of current technology, scale and various limitations the designs have to be tweaked, often making a better and more unusual piece.
Visual Screen Shots of Producing Piece
At each step of producing my model, I took screen shots to show its development and how the piece came together. Looking back on it now, I can see that it was quite a simple shape which manipulated can form intricate and detailed models. The steps involved to produce the model where quite time consuming and cover pages of my note book.

Below is the final drawing of my prototype. I am quite happy with the outcome and am impressed with myself with what I have achieved. Using the 3DS Max software, learning the basics in 3 weeks and completing a model to be printed is quite an achievement if I say so myself!

The design concept is that each piece is not attached and will be printed as single objects. The individual rings can sit inside each other or be pulled out and separated. The versatility of the design allows it to be appropriate for many different uses and markets.
14 February 2011
Design Implications and Limitations
When I came to printing my sample, I realised that my model was impossible to build. The limitations of the size of the final model, to the scale of waves means that the model would be too fine to hold together. The sample size was 120x120x35mm therefore when the model was being printed, each wave would be so fine, practically dust particles, as it is such a detailed and intricate sample. Although it was frustrating having to rework my design, I found it interesting, developing it further, to make it a more viable product.
Amendments made...
As you can see, I have reduced the amount of columns on the design. By reducing this and ensuring the width of each wave being 2mm (minimum) it means that the model could be produced on the Z-Corp Machine.


As you can see above a artwork has been over-layed on top of the Rendered design.
I visualise this concept in a high end flat, for the young city professional.

Final Result


Material - 3D Rapid Prototyping, ABS- z-corp
Dimensions -120 x 120 x 35mm
Key Features
Inspiration taken from David Nash
Tools used in 3DS MAX - array, soft selection, proboolean
More
Huddersfield University (2011) Extra Ordinary 3d Materials [online] http://extraordinary-3d-materials.blogspot.com/ [Accessed: 10th February 2011)
Cass Sculpture Foundation, (2011) David Nash [online] http://www.sculpture.org.uk/artists/DavidNash/ [Accessed: 21st January 2011)
Lefteri, C (2006) Materials for Inspirational Design. Rotovision.
Typical Application
Interiors, typically a wall-covering, tiles, partition wall. By combining Shape Memory Alloys into this concept piece, it allows the plastic to bend and mould to the temperature of a room. To ensure the waves are flexible, additional plasticised should be added to the powder mix, this will enable movement.
13 February 2011
Final Design Concepts
Design Concept Development 1:

Design Concept Development 2: Design Concept Development 3:
 The design you see in below are photographs of the printed prototype

Base Design of Prototype:


Design Concept Development 2:
 Design Concept Development 3:
From the designs, and further developments, I came to a final choice, which was accepted by the printers, and was accepted as a design proposal. Although I wanted a prototype which could represent a design concet for a constructed light bulb, due to the measurements we were limited to for a design sample, it would have resulted in a very small prototype. The design which was taken through as a final concept is shown below. It has a build up of 3 different layers, which form like a spiral, with intricate detail forming within each layer. I think this design will make a really interesting design concept for lights. Final Accepted Design Concept:

This is the final design concept which has been taken through to the final design stage. The interesting aspect of this deisgn are the 3 different levels, which can be clearly seen in the right/left view, the spiral effect makes the design look really interesting. Due to the printing dimension limit, its quite difficult to see how a design would actually look. We have been working to guidelines of 120mm x 25mm x 120mm. This process is quite costly due to the material also, and a price can only be given once a design has been constructed, which therefore makes it rather difficult for testing and experimenting processes to take place.

Base Design of Prototype:
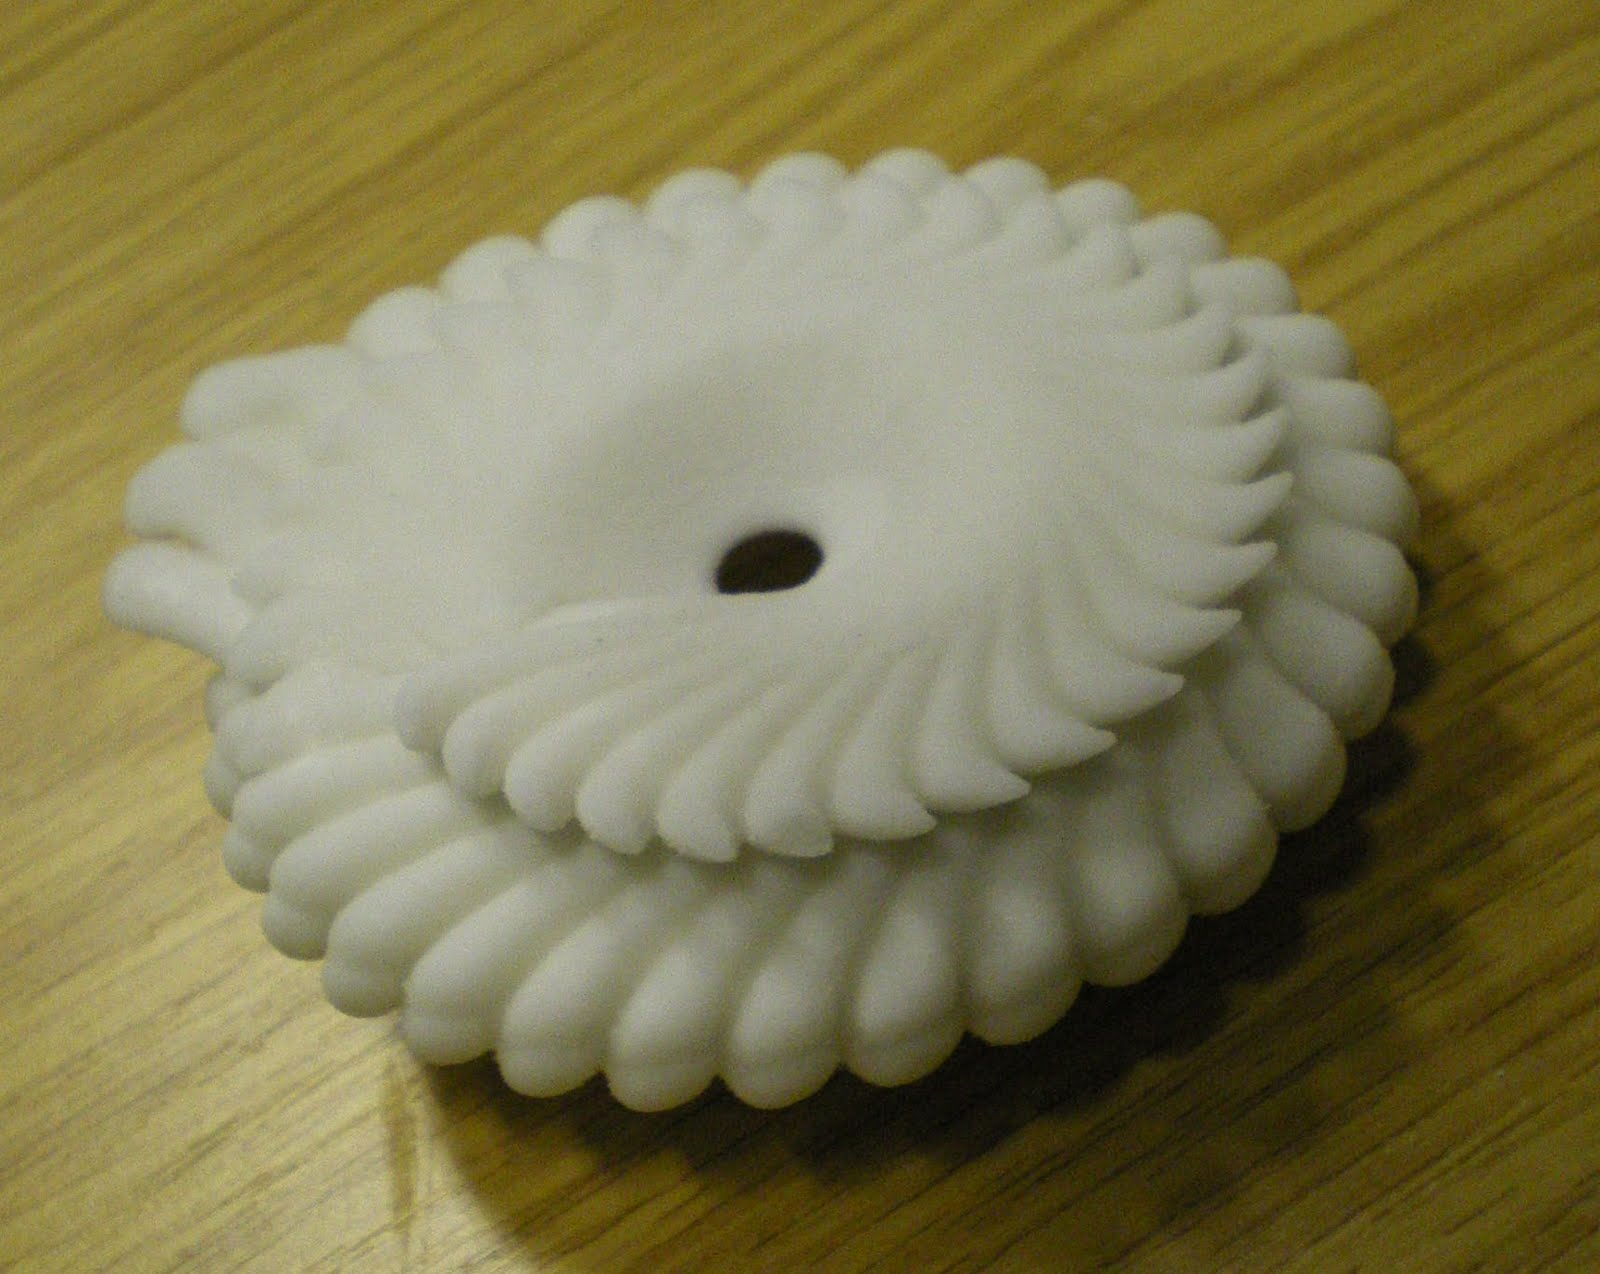
Seeing the design as a finished product was really interesting, and the scale is so much smaller than expected. This journey and project has definatly been a learning curve, and will be interesting to continue to progress working using this design element to see where it could take me for my Final Major Project.
Subscribe to:
Posts (Atom)