3D STUDIO MAX – 4TH FEBRUARY 2011
TRAINING / Week 3
Final Design & Process:
This next section is my reflective journey and progress development of the techniques I have learnt over the 3 weeks of this project and implementing my design ideas into a 3D concept. We are now in the third week of the project, from the presentation and design ideas we have proposed, and the feedback received I am now able to develop my designs further into a working prototype.
Inspiration - Lighting:
The design concept for this project is to design for the Interiors market, looking into lighting and how new innovative ways of lighting can be designed. From market research and looking into how the lighting industry is developing I have decided to develop my designs and look into new ways as to how lighting can work, firstly as an art installation, and also looking at how light is portrayed.
Constructed Light Bulbs:
From Market research and visiting the Birmingham Interior Design Show January 2011, the lighting areas inspired me a lot, one in particular was ‘PLUMEN’
“Plumen is the antithesis of low energy light bulbs as we know them. Rather than hide the unappealing traditional compact fluorescent light behind boring utility, Plumen 001 is a bulb you’ll want on show” (Plumen (no date)[1]
[1] Plumen (no date) The Designer Energy Saving Light Bulb. Available at: http://plumen.com/ (Accessed 7 January 2011)

Constructed lamp shades, geometric constructed shapes - Le Klint Lampshades


Living etc (no date) Le Klint Lamp shade. Available at: http://www.livingetc.com/design_classics/Le_Klint_lampshades_article_147240.html (Accessed 28th January 2011)2
From the inspiration of Plumen, and research I intend to now develop my initial ideas and thoughts into creating various design concepts for both a lighting installation and a light bulb.
The following will be a recording of my progress, development and how I have gone from start to finish and how each design has been constructed. Although It has only been 3 weeks of training on this software, hopefully I can continue developing and progressing to gain a further understanding and use this process as part of my FMP.
Design Inspiration:
The design inspiration for this design project has come from the concept of shadows, and all things hidden. The underlying meaning and purpose behind this project shows the nature of being guarded, and how ourselves as individuals are like delicate valuables which are protected. It will portray a deeper understanding and a reflection of a journey which many remain unaware of.
The lighting will consist of a design which incorporates the initial light, or possibly a shade which forms the outer protection to bulb, or the actual bulb which protects the inner light. I aim to design a new form and concept of lighting which becomes unique and interesting.
Creating the Design Concept:
Using the techniques and skills which I have been taught and learnt over the past few weeks, i began applying them into a final design. By firstly drawing out an initial box, i began the editing process using the extruding technique, and converting the object to an editable poly. I wanted to have a more structured upper surface, and therefore by duplicating an object and positioning it beside the first object will enable a much stronger structure to work from.
To duplicate the object simply select the whole object until it is fully highlighted, and then by holding down the shift key and drag the object out beside the first object. A window will then appear offering the options to either clone the second object to first one or simply as an extra element and then click ok.

I began the initial design stages by extruding from the original object, which can be seen. Once an object has been extruded, it usually extrudes vertically. This can be adjusted by simply using the key tools on the tool bar above.

To extrude two objects at a time, simply by holding down the shift key and selecting both areas, and locking them into place enables both sections to be extruded exactly the same time, and of the exact same shape and movement.

This next image is the current construction of the design in the side perspective view. I am going to use this structure to further develop the concept of shadowing, but firstly converting it to turbo smooth to see the design construction is a smooth mode, and then experiment with duplicating, repositioning and other design features.

Changing an object into Turbo Smooth:
To change the object into turbo smooth mode enables the design to be seen in a much clearer, smooth view. To do this simply in modify mode, select the option turbo smooth and the design becomes less rigid, edges are curved and smoother. This will now enable me to develop the design further.

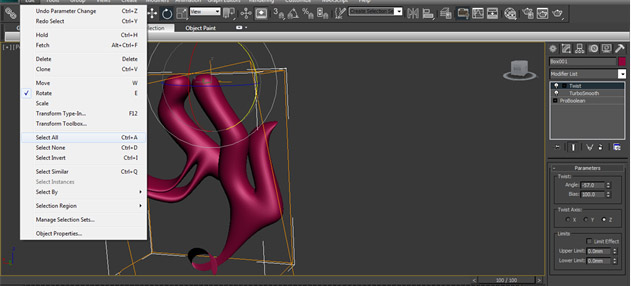
Adding Modifiers:
To manipulate the design further, I added a modifier known as ‘Twist’ simply by selecting the modifiers tab, and scrolling down to twist.

By editing the Angle and the Bias of the twist parameters, enables the manipulation of the design to alter which can be seen in the screen capture above.

Duplicating & Finalising a design:
By firstly selecting the object, going to Edit, and select all, will enable whatever step is now taken forward will change the complete object as a whole and not a section of it.
I want to duplicate the object now, and begin experimenting with angle, rotation, and movement. Therefore by holding down the shift key, and dragging the object outwards, a window will appear commanding how many copies you wish to make. For example 9 copies were entered which resulted in the object multiplying as shown in the scree capture below.

Although the object has clearly been duplicated, I want to create a duplicate that is rotated on a circular dimension. To do this works in exactly the same way however this time, by selecting the rotation, and holding down the shift key and dragging the object will enable the object to be duplicated in a circular position rather than a straight continuing line.
Using the rotation tool instead of teh move tool, using the same process, I copied one of the shapes and rotated anti-clock wise to create a circular structure. We can see how the duplicity of the object has rotated; this is the outcome after 6 duplicate copies.

By increasing the amount of rotational copies to 12, this will complete the design as a whole complete object.

We can see how now the object becomes complete as a design, and the original shape, was simply the first element of the design. The shape interlocks with one another and works very effectively as a form of lighting and as a design.
First Design concept for Lighting:
Front View:

Back View:

Second Design Concepts for Light Bulb:
Initial Drawing & Suggestion:


Interlocked layers, entwined to construct one shape, to form the conbsturtcion of a light bulb, Lights could easily be place inside the construction, and then be used as a form of decorative lighting.
Third Concept for Lighting:

Left View
Front View

Back View

I really like this design concept, the build-up of layers, the design concept from each angle is different and intriguing and would be really interesting as a lighting prototype.
No comments:
Post a Comment